

Bus Depot Poptop Canvas & Seals for Volkswagen Campers
Buyer Beware: Not all aftermarket canvas is the same!
We've sold poptop canvas for years and have seen them all. The worst of them are Chinese knockoffs that are lousy quality and don't even fit properly. Others look okay but fit poorly, or fit okay but look nothing like the original. Watch out for misleading terms like "original German quality" (which means nothing) or prices that are too good to be true. Poptop canvas installation is not exceedingly difficult, but it is time consuming. It's a big enough job that you don't want to do it twice. This page will help you learn about your various options. You can also find some basic installation hints further down on this page. (Of course detailed instructions are included with our Westy canvas.)
Cotton? Sunbrella? Polyester? Hemp? What's the best material?
Cotton:
For over 50 years and counting, Westfalia has advocated cotton as the best material for poptop canvas, for the same reasons that the best camping tents are cotton based. Among the attributes of cotton:
- It's extremely durable and time-proven. (Your original canvas lasted about
__25 years, right?)
- It breathes well (so it you won't get stuffy inside the camper or have
__condensation problems).
- Cotton's pliability and natural "stretch" make it easier and more forgiving
__for the novice to install.
- It's highly water resistant.
- It's reasonably priced.
Caring for your cotton poptop canvas is pretty simple. It's perfectly fine to let it get and stay wet if it rains on your camping trip, as long as you air it out to dry at the earliest convenience when you get home and the rain ends. (Think of a pair of jeans, which are also cotton. They can go through the washing machine a million times and the water won't hurt them.) Your canvas will be waterproof even if not treated, although you can use tent waterproofing spray from a camping supply or sporting goods store if you like.
Sunbrella:
Some retailers promote Arcylic (typically marketed under the names Sunbrella and Outdura) as the latest-and-greatest material for poptop canvas. Acrylic is a chemically synthesized fiber that is dyed while still in viscous form, which keeps it from fading after prolonged exposure to bright sunlight. It is also non-porous and doesn't absorb moisture. Both of these characteristics make it a great material for boating use, where the material is on the water and constantly damp, and is also constantly exposed to extreme sunlight reflected off of water (which maginfies its effect, for the same reason that you sunburn at the beach).
However a Westy isn't a boat, and it presents a different set of needs. Your poptop canvas is actually more like a camping tent perched on a van. And nobody uses Acrylic for tents, for good reason. First of all, Acrylic's biggest advantages for boating applications aren't all that important in a tent. Unlike a boat, a tent is not continuously exposed to severe reflected sunlight and water. (Even when it rains; there is generally plenty of time for it to air out to dry before the next camping trip.) Also, Acrylic has a couple of drawbacks that make it less than an ideal material for a tent or poptop canvas:
- It doesn't breathe well, which can make things stuffy inside and prone to condensation.
- It's rather stiff, which makes it harder to fold in when you close the poptop.
- The material doesn't stretch; combined with its stiffness this makes installation harder, particularly in the corners.
- It's expensive. You pay about $200 extra for Sunbrella/Acrylic versus a comparable aftermarket cotton canvas. This makes an aftermarket
__Sunbrella or Arcylic canvas (there is no such thing as an OEM one) even pricier than a genuine OEM German canvas, and much pricier
__than an aftermarket cotton one.
So is Acrylic worth its significant price premium? It's certainly well worth considering if you want custom colors, as that is quite literally where it shines; the color is solution-dyed and will stay bright for years. But if long-term fade resistance isn't your biggest concern when it comes to a poptop canvas, we believe that cotton's other advantages make it the better overall choice. That said, we gladly offer both at significant savings, so the choice is yours.
Polyester:
Some "synthetic" canvases on the market are not Acrylic at all, but polyester. The main incentive for using polyester is cost, not quality. Even coated/treated polyester can cost half the price of quality cotton. While polyester is reasonably durable and water resistant, it has a fatal flaw: It doesn't breathe. If you've ever worn polyester on a hot day, you may have learned the hard way that it traps heat and moisture in. That is why polyester is not generally used for spring/summer clothing, bed sheets, etc.- anything where warm-weather comfort can be a factor. When used for poptop canvas, the lack of breathability can make your camper stuffy and cause indoor condensation. The only workaround is to keep your windows open, which can be a problem if it rains or if the temperatures dip overnight. As a result, polyester based material is not ideal as a poptop fabric.
Hemp:
No poptop canvas is actually pure hemp, but instead is roughly a 50/50 cotton/hemp blend. That's because hemp isn't well suited for poptop canvas. At this time only one vendor offers hemp, and they actually admit that they have to blend it with cotton due to cotton’s “vastly improved water-repellancy,” softness, and tighter weave. This begs the question: if cotton is so much better than hemp in so many critical areas (especially keeping water out of your camper!), then why add the hemp in the first place? Buying a hemp canvas is really more of a "statement" than a good practical choice. There are plenty of great uses for hemp but this really isn't one of them, so we don't offer it.
Bus Depot's canvas offerings:
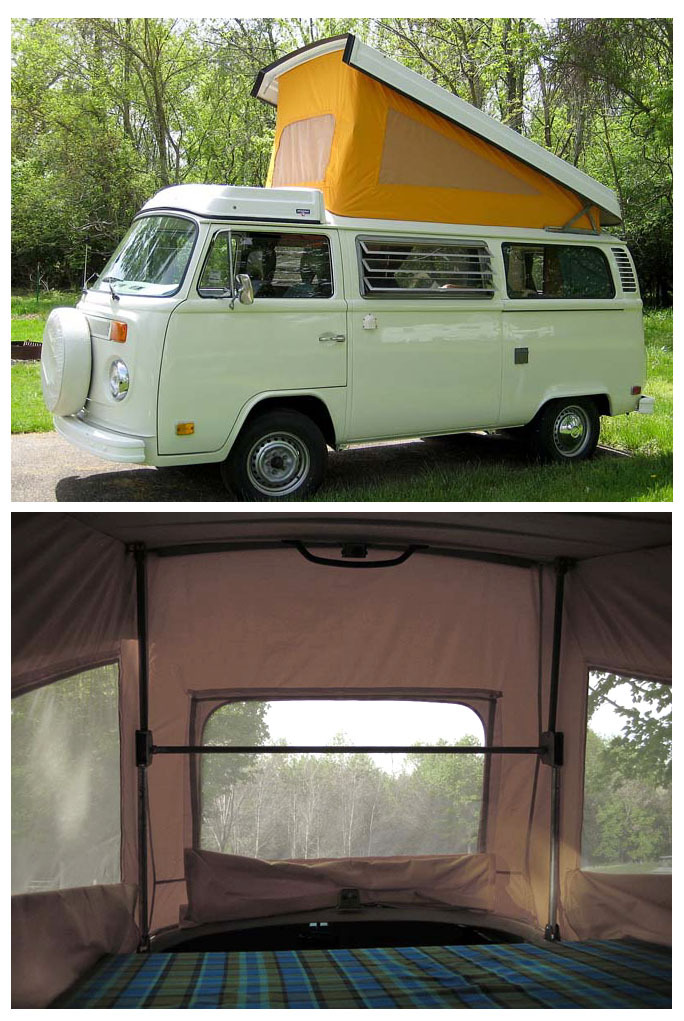
Bus Depot's Own 68-91 Westfalia "Clone" Poptop Canvas
Nothing is closer to the the original Westfalia canvas than our "clone," because nobody knows more about poptop canvas. We were the U.S. distributor for the original OEM canvas for decades, which gave us the experience and expertise to make a nearly perfect clone ... with a few improvements. Before introducting our Clone a dcade ago, we spent almost two years in design and rejected dozens of fabric samples until we found one so similar to the OEM canvas that you couldn't tell them apart side by side, not just in terms of thickness but even thread count. A customer once compared them with a micrometer and reported that they were so close that the difference was less than the width of a human hair. (By comparison some aftermarket canvas is half the thickness of the original, or has so low a thread count that it is nearly porous.) We used three screened windows like the later Westfalia production had, but by popular demand we made the side windows slightly larger for improved ventilation. We also integrated an upgraded design that Westfalia added in later production, using a zipper/velcro combination that allows the front window to stay open in any position, and even be removed entirely in the event that you rip the screen and need to replace it, Attention was paid to every detail, from the quality nylon zippers to the double-stitching to the material itself. When we came out with it years ago, the OEM one was also still available and we sold both. Even our own employees had to check the label sewn inside to tell them apart.
We also made proper fit a top priority. Westfalia designed the poptop canvas to be very taut, with a tolerance of only a few inches overall. This gives the finished installation a clean professional look and keeps it from flapping around in the wind, but it also means quality control is critical. Most aftermarket canvases have sample-to-sample size variation that is literally several times the factory tolerance. So you end up playing the "poptop canvas lottery" - hoping for a good fit, but just as likely ending up with a finished installation that is either too tight, or loose and floppy. To ensure that the canvas you install will fit perfectly, every Bus Depot canvas is individually measured. If it doesn't meet the same stringent Westfalia specifications as the original, it doesn't go out the door, plain and simple.
Today, with the OEM one no longer made, our Clone is the closest you can buy at any price ... yet it sells for half of what the OEM one sold for. It's the only cotton canvas that has a ten year track record, with literally thousands in use today, so it's proven to last like the original. And it's the only one patterned directly after the original, right down to the fabric. You could spend more (a lot more!) but you won't find a better canvas. Our Bus Depot canvas is available in your choice of Tan or Yellow for Buses, and Tan or Gray for Vanagons.
'68-91 Synthetic Acrylic ("Sunbrella") in Custom Colors:
Since the original Westfalia canvas was cotton, so is our clone. But if you prefer Acrylic, we do offer a high quality North American made Acrylic poptop tent in a variety of colors, including gray, tan, yellow, dark green, or maroon. Most of the Acrylic poptop canvas sold in the U.S. comes from the same factory, and this one is no exception. The quality is very good, and the fit, while not always as dead-on as our clone, is extremely good. Given that this factory supplies most of the VW parts specialists, you'll most likely get this one no matter where you buy it, but we do charge a bit less. It is made to order and generally takes a few weeks. (See our article above regarding Acrylic vs. Cotton.)
Pre-1968 Westfalia Canvas
We offer U.S. made replacement canvas for Splitties in Acrylic, in your choice of colors. Click on the link below for color options.
ASI/Riviera, Sportsmobile, and Country Homes Canvas
If you have one of these rare campers with the "straight-up" penthouse style poptops, we have the replacement canvas you need. This is made by the original factory supplier to ASI and Country Homes, and uses heavyweight 14 ounce polyeurothane coated vinyl as was originally found on those campers. Color choices are yellow or white. This canvas is made to order and takes about 3 weeks to ship.
Eurovan Canvas
We offer genuine Winnebago replacement canvas for Winnebago Eurovan Campers, as well as U.S. made Synthetic Acrylic ("Sunbrella") canvas for both Westalia and Winnebago poptops in your choice of colors. We also expect to be offering cotton Westfalia tops this summer.
Click below to view our Pop Top Canvas selection:
Westy canvas Installation Hints: The official VW instructions involve completely removing the poptop, but most people do it wiith the poptop still on. It is not very difficult (requiring only a short screwdriver and staple gun), but it can be time consuming, since a large number of screws and staples are used to hold the canvas on. Our Westfalia and Bus Depot canvases come with detailed instructions, plus links to a video showing step by step installation done by a professional.
Important: Please thoroughly inspect and carefully measure your canvas before beginning installation to ensure that you have a correct replacement. We cannot take back partially installed canvas.
 Our poptop seal kit was the very first product we designed in-house, nearly 20 years ago. The major flaws of the other kits on the market - which continue to this day - led us to "build a better mousetrap." Our kit is still the best on the market - not only better (and cheaper) than any competing aftermarket product, but better than the $600 original German seal as well. It protects your camper better, installs faster (with no adhesive required), lasts longer, and looks closest to stock. Read below to learn what makes ours better. You can buy each seal section individually, or get a complete kit for '74-91 Westfalia campers for just $79.95.
Pop Top Seal:
This seal insulates and keeps rain out, protecting your canvas. If yours is sagging, the metal clips inside have rusted. Our replacement installs in ten minutes, and uses aluminum clips so it will never rust. Most replacement "poptop seal" sold elsewhere is actually just a generic "off the shelf" weatherstrip that the retailer buys in big rolls and cuts to size. Not ours. It is specifically designed for the Volkswagen poptop, with an insulation bulb precisely located to match the original German design. This keeps windswept rain from creeping under the seal when your poptop is closed, wetting and eventually mildewing your canvas. In addition, the cosmetic finish looks closer to stock than on any other seal available.
On '67 and earlier campers (small poptop), this seal goes around all 4 sides. On '68-73 it goes around the two sides and the rear (you use the Flat Seal, below, for the back), On '74 and later campers it goes around the two sides and the front (again, you use the flat seal, below, for the remaining side). It is available in pre-cut lengths for all Westfalias, or sold by the foot for custom use on non-Westfalia campers.
Luggage Rack Edging:
Originally found on '74 and later Westfalias (but also available for '68-73), this seal's primary purpose is cosmetic. It is not meant to block rainwater like the poptop seal, but rather to allow it through, so rainwater in the luggage rack can drain out into the rain gutters. Ours is designed for that purpose, and also can be installed without loosening or removing the luggage rack. This makes the installation quick and easy, and avoids the risk of the luggage rack not reinstalling snugly (which can cause wind noise). By comparison, other retailers sell the same generic weatherstrip they use for poptop seal (see above) and call it luggage rack seal. Bad idea. Not only does their seal trap water under your luggage rack, but its fatter profile requires you to loosen or remove the luggage rack to install it- turning a 10 minute job into a two hour job (or longer if you have trouble snugging the luggage rack back up when you're done). As with our poptop seal, our luggage rack seal uses no-rust aluminum clips.
Flat Seal:
On '68 and later Westfalias, this is the seal that goes along the leading edge of the poptop where it comes down to meet the luggage rack. Ours is the only flat seal that has an imbedded clip for attachment, so it installs in minutes. Our competitors' versions must actually be glued to your poptop.
Click below to purchase a Pop Top Seal:
Installation Hints:
Poptop Seal: The insulation bulb on the poptop seal faces the inside of the van. It helps to slightly raise your poptop (but not extend it all the way) when installing.
Luggage Rack Edging: Use a thin flat object (about the size of a flathead screwdriver blade) to help coax the lip of the new seal under the luggage rack. (However, use something relatively soft, perhaps made of wood or plastic; an actual screwdriver will easily scratch your paint if your hand slips!)
Flat Seal: On the original VW seal, this flat seal was actually attached to the 3-sided section, whereas on the aftermarket seals it is a separate piece. If re-using your original flat seal, simply use an exacto knife or razor blade to separate it from the worn out 3-sided section (although we do recommend replacing all of the seals at once, as it will save you the trouble later). The new 3-sided poptop seal and the flat seal (new or old) can be mated together just by butting them up against eachother and trimming slightly with an exacto knife or razor blade for a clean seam. You can use some weatherstrip adhesive or silicone at the seam, but it isn't necessary.
60-67 Bus Pop Top Seal
| Item | Description | Price | Part Number | ||
|---|---|---|---|---|---|
| Add to Cart | Poptop Seal | for Westfalia Small Poptop, 60-67 | $73.95 | 231067706 | |
| Add to Cart | Poptop Seal | Per Foot (for poptop campers other than Bus Westfalia or Vanagon Westfalia, for which we offer pre-cut lengths). | $1.95 | 231070100 |
68-73 Bus Pop Top Seal
| Item | Description | Price | Part Number | ||
|---|---|---|---|---|---|
| Add to Cart | Poptop Seal | NOT ALL POPTOP SEAL IS THE SAME. See Details to learn why ours is far superior. Fits 68-73 Westfalia (does both sides and front). | $49.95 | 231069710 | |
| Add to Cart | Flat Poptop To Luggage Rack Seal | Across leading edge of poptop (where it meets luggage rack). Ours is the only one with an integrated clip; no glue required. | $19.95 | 231070709 | |
| Add to Cart | Luggage Rack Seal | 68-73 Westfalia. Goes around luggage rack where it meets roof. | $19.95 | 231070732A | |
| Add to Cart | Poptop Seal | Per Foot (for poptop campers other than Bus Westfalia or Vanagon Westfalia, for which we offer pre-cut lengths). | $1.95 | 231070100 |
74-79 Bus Pop Top Seal
| Item | Description | Price | Part Number | ||
|---|---|---|---|---|---|
| Add to Cart | Complete Poptop Seal Kit | Not all poptop seals are the same. See Details to learn why this kit is FAR superior to all others. For 74-91 Westfalia Camper (plus '68-79 ASI/Riviera). Complete kit does poptop, luggage rack, and flat seal in between. | $79.95 | WESTYRUBBER | |
| Add to Cart | Poptop Seal | NOT ALL POPTOP SEAL IS THE SAME. See Details to learn why ours is far superior. Fits 68-73 Westfalia (does both sides and front). | $49.95 | 231069710 | |
| Add to Cart | Flat Poptop To Luggage Rack Seal | Across leading edge of poptop (where it meets luggage rack). Ours is the only one with an integrated clip; no glue required. | $19.95 | 231070709 | |
| Add to Cart | Luggage Rack Seal | 68-73 Westfalia. Goes around luggage rack where it meets roof. | $19.95 | 231070732A | |
| Add to Cart | Luggage Rack Seal | 74-91 Westfalia Camper. (Ours is the only one that can be installed without loosening or removing the luggage rack.) | $14.95 | 231070732 | |
| Add to Cart | Luggage Rack Seal W/Bulb For Special Applications | Has a bulb on the inside of the seal, for '74-91 Westfalia campers that experience wind noise when using the standard luggage rack seal. | $19.95 | LUGSEAL2 | |
| Add to Cart | Poptop Seal | Per Foot (for poptop campers other than Bus Westfalia or Vanagon Westfalia, for which we offer pre-cut lengths). | $1.95 | 231070100 | |
| Add to Cart | Poptop Seal | Does both sides and rear. Bus Depot exclusive, closer to orig. than any sold elsewhere. No-Rust Design. 74-91 Westfalia. | $49.95 | 231070708 |
All Vanagon Pop Top Seal
| Item | Description | Price | Part Number | ||
|---|---|---|---|---|---|
| Add to Cart | Complete Poptop Seal Kit | Not all poptop seals are the same. See Details to learn why this kit is FAR superior to all others. For 74-91 Westfalia Camper (plus '68-79 ASI/Riviera). Complete kit does poptop, luggage rack, and flat seal in between. | $79.95 | WESTYRUBBER | |
| Add to Cart | Flat Poptop To Luggage Rack Seal | Across leading edge of poptop (where it meets luggage rack). Ours is the only one with an integrated clip; no glue required. | $19.95 | 231070709 | |
| Add to Cart | Luggage Rack Seal | 74-91 Westfalia Camper. (Ours is the only one that can be installed without loosening or removing the luggage rack.) | $14.95 | 231070732 | |
| Add to Cart | Luggage Rack Seal W/Bulb For Special Applications | Has a bulb on the inside of the seal, for '74-91 Westfalia campers that experience wind noise when using the standard luggage rack seal. | $19.95 | LUGSEAL2 | |
| Add to Cart | Poptop Seal | Per Foot (for poptop campers other than Bus Westfalia or Vanagon Westfalia, for which we offer pre-cut lengths). | $1.95 | 231070100 | |
| Add to Cart | Poptop Seal | Does both sides and rear. Bus Depot exclusive, closer to orig. than any sold elsewhere. No-Rust Design. 74-91 Westfalia. | $49.95 | 231070708 |
Eurovan/Other Pop Top Seal
| Item | Description | Price | Part Number | ||
|---|---|---|---|---|---|
| Add to Cart | Poptop Seal | Per Foot (for poptop campers other than Bus Westfalia or Vanagon Westfalia, for which we offer pre-cut lengths). | $1.95 | 231070100 |